tips & tricks
QUILT BACKING SIZE:
Before bringing your quilt to a Longarm Quilter, be sure your backing fabric is at least 4 inches larger on EACH side than your quilt top. For Example: If your quilt top is 60 x 60, your backing needs to be 68 x 68.
Below is detailed information about adding borders to your quilt. This includes:
- Piecing Border Strips
- Overlapped Borders
- Mitered Borders
Whenever possible purchase enough fabric to cut borders on the lengthwise grain (parallel to the selvage edge). It is the strongest grain and will help to prevent stretching and fullness along the outer edges of the quilt. When you must piece border strips, sew together with a 45 degree angled seam. The diagonal seam will be less noticeable than a straight seam.
Step 1. Begin by layering right sides of fabric together, overlapping as shown below.
Step 2. Draw 45 degree angle line from top left to bottom right. Use points where strips crossover as guide for drawing line.
Step 3. Sew directly on top of line.
OVERLAPPED BORDERS
Step 1. Before cutting border strips, measure the quilt top vertically, along each side, and in the middle. Add these three measurements together and divide by three. The averaged number is the length for the side border strips. Cut border strips desired width, using length according to averaged measurement.
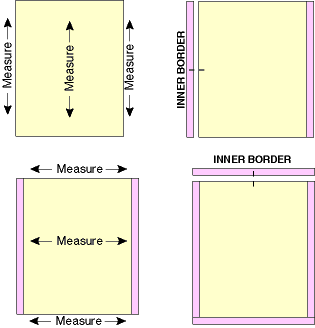
Step 2. Mark center on each strip and on each side of the quilt top. Match center marks. Align and pin end of strip with each corner edge of quilt top. Pin layers together, easing in any fullness. Sew strips to top.
Step 3. Repeat measuring, pinning and sewing steps for the top and bottom border strips.
Step 4. Repeat Steps 1-3 for additional borders. When finished, the quilt top will be squared with any fullness located within the patchwork area. Normally the quilting process will eliminate the fullness. This method will help to eliminate a rippling effect in the borders.

MITERED BORDERS
Miter border corners when an angled seam complements the overall design of the quilt. For multiple borders, sew strips together first and attach to quilt as one unit.
Step 1. Cut 2 strips the width of the quilt plus twice the border width and 2" inches extra and 2 strips the length of the quilt plus twice the border width and 2" inches extra.
Example: Width of quilt before border = 65"; width of border(s) to be added = 6"
65" + 6" + 6" + 2" = strip 79" long. Cut 2 strips 79" long (width measurement).
Repeat steps for length of quilt.
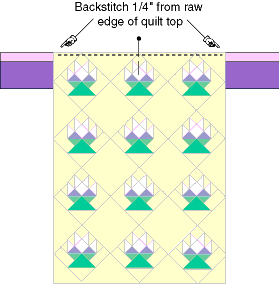
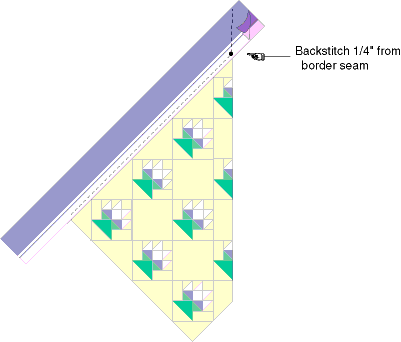
Step 2. Center and pin border strips in place. Start and end seams 1/4" from raw edges: backstitch to secure. Press seams toward quilt top.

Step 5. Press seam open. With quilt right side up, align 45 degree angle line of square ruler on seam line to check accuracy. If corner is flat and square, trim excess fabric to 1/4" seam allowance.